Water-damaged hardwood floors can be a homeowner’s nightmare, but with prompt and effective action, you can minimize the damage and restore your floors to their original condition. Hardwood flooring, prized for its beauty and durability, is particularly vulnerable to water damage, which can lead to warping, buckling, and mold growth. In this guide, Intensa Dry Mold & Water Restoration provides us essential steps for assessing the extent of water damage, removing excess water, thoroughly drying the area, and inspecting and repairing any affected floorboards. Additionally, it offers tips on sanitizing, refinishing, and preventing future water damage to ensure your hardwood floors remain a stunning and durable feature of your home.
1. Assess the Damage
The first step in dealing with water-damaged hardwood floors is to assess the extent of the damage. This involves identifying how much of the floor is affected and determining the severity. It’s crucial to inspect not just the surface but also underneath the floorboards if possible. Look for signs such as discoloration, warping, or cupping of the wood. These symptoms indicate that water has penetrated the wood fibers, potentially causing long-term damage.
Additionally, check for any signs of mold or mildew, especially if the water has been sitting for a while. Mold can develop quickly in damp conditions, and it can pose health risks as well as cause structural damage to your floors. If the damage is widespread or severe, it might be wise to contact a professional for a thorough inspection and assessment. They have specialized tools like moisture meters to accurately gauge the moisture content in the wood and subfloor.
2. Remove Standing Water
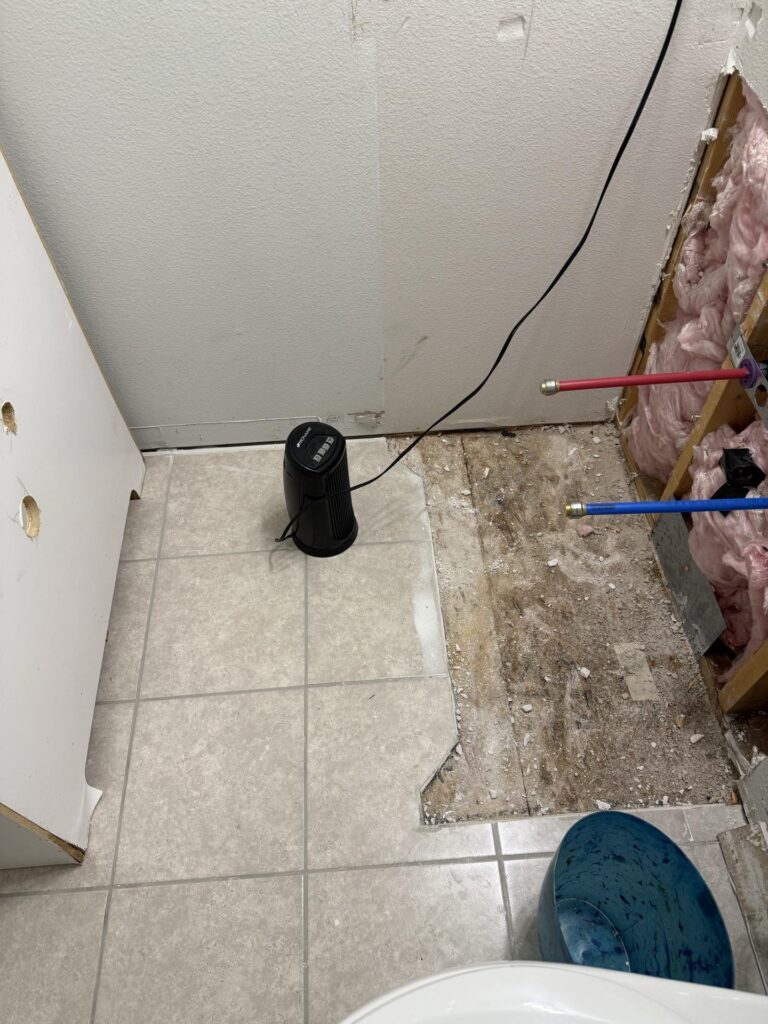
Once you’ve assessed the damage, the next step is to remove any standing water. This is a critical step to prevent further damage. Use a wet/dry vacuum to suck up as much water as possible. If you don’t have a wet/dry vacuum, mops and towels can be used, although they may not be as effective for large amounts of water.
If the water is from a clean source, such as a burst pipe or a spill, you can generally handle this yourself. However, if the water is contaminated, like from a flood or sewage backup, it’s essential to take proper safety precautions and consider professional help. Contaminated water can pose health risks and requires proper handling and disposal.
3. Dry the Area
After removing the standing water, the next step is to dry out the affected area thoroughly. This is one of the most critical steps in preventing further damage and mold growth. Start by opening windows and doors to allow fresh air to circulate, which will help the drying process. Use fans to increase air circulation around the damaged area. Place them strategically to blow air across the floor’s surface and underneath, if possible.
Dehumidifiers are also highly effective in removing moisture from the air, which in turn helps to dry out the floors more quickly. For large areas, consider renting industrial-grade dehumidifiers. Depending on the extent of the water damage, this drying process could take several days to a week or more. It’s crucial to ensure the floors are completely dry before proceeding to the next steps to avoid trapping moisture in the wood.
4. Inspect for Damage
Once the area is dry, conduct a detailed inspection of the hardwood floors to identify any damage that needs repair. Look for signs of warping, buckling, or gaps between the floorboards. Warping occurs when the wood bends or twists, while buckling happens when the floorboards lift from the subfloor. These issues occur because wood expands when wet and contracts when it dries, causing structural changes.
If you notice minor warping or cupping, you might be able to fix it by sanding and refinishing the floor. However, significant damage, such as large areas of buckling or extensive mold growth, may require replacing the affected floorboards or even the entire floor. In some cases, the subfloor beneath the hardwood might also be damaged and need attention.
5. Sanitize and Disinfect
After drying and inspecting the floors, it’s essential to sanitize and disinfect the area to prevent mold and mildew growth. Use a wood floor cleaner that’s appropriate for your type of flooring. Mix the cleaner with water according to the instructions on the bottle. You can also use a mixture of white vinegar and water as a natural disinfectant.
Using a mop or cloth, clean the floor thoroughly, ensuring you reach into the gaps between floorboards where mold and bacteria might hide. After cleaning, allow the floor to dry completely. It’s a good idea to follow up with a mold-inhibiting solution, especially if the water damage was severe or if you’ve already noticed mold growth. These solutions are available at most hardware or home improvement stores.
6. Restore the Finish
If the water damage has affected the finish of your hardwood floors, you may need to refinish them to restore their original appearance. This involves sanding down the top layer of the wood to remove any damaged finish, stains, or minor warping. Use a drum sander or orbital sander for this process, starting with coarse-grit sandpaper and gradually moving to finer grits for a smooth finish.
After sanding, clean the floor thoroughly to remove all dust and debris. Then, apply a wood stain if desired, followed by a protective finish such as polyurethane. The finish not only restores the floor’s appearance but also provides a protective layer against future damage. Make sure to apply multiple coats, allowing each coat to dry completely before applying the next. This process can take several days, but it’s essential for achieving a durable and attractive finish.
7. Replace Damaged Boards
If during your inspection you find that certain boards are beyond repair, it’s time to replace them. Start by identifying the damaged boards and marking them for removal. Use a circular saw to cut along the damaged board’s edges, being careful not to cut into the subfloor. Pry up the damaged boards with a chisel and hammer.
Next, prepare new boards for installation. Ensure they match the existing floor in terms of wood type, color, and dimensions. Measure and cut the new boards to fit precisely in the gaps left by the removed ones. Apply a wood adhesive to the subfloor and place the new boards into position. Secure them with finishing nails, making sure they sit flush with the surrounding floor. Finally, sand the new boards lightly and finish them to match the existing floor.
8. Address Subfloor Issues
In some cases, water damage might have affected the subfloor beneath your hardwood flooring. If you notice sagging, swelling, or a persistent musty smell, it’s likely that the subfloor has been compromised. To inspect the subfloor, remove a few boards to gain access.
If the subfloor is damp, use fans and dehumidifiers to dry it thoroughly. If you find mold or rot, it’s essential to remove the affected sections. Cut out the damaged subfloor using a circular saw and replace it with new plywood. Ensure the new subfloor sections are securely fastened to the floor joists and are level with the existing subfloor. After repairing or replacing the subfloor, re-install the hardwood boards as described in the previous step.
9. Prevent Future Water Damage
Once your hardwood floors are repaired, take steps to prevent future water damage. Start by identifying potential sources of water intrusion, such as leaks in plumbing, windows, or roofs. Address these issues promptly to prevent water from reaching your floors.
Additionally, consider applying a water-resistant sealant to your hardwood floors. This can provide an extra layer of protection against spills and minor water exposure. Be mindful of indoor humidity levels, especially in areas prone to dampness like basements and kitchens. Use a dehumidifier to maintain optimal humidity levels and reduce the risk of moisture-related issues. Regular maintenance and prompt attention to spills and leaks will go a long way in preserving the condition of your hardwood floors.
10. Consider Professional Help
For extensive water damage or if you’re unsure about any part of the repair process, it’s advisable to seek professional help. Water damage restoration specialists have the expertise and equipment to handle severe cases effectively. They can ensure that all moisture is removed, prevent mold growth, and restore your floors to their original condition.
Professional flooring contractors can also assist with replacing and refinishing damaged boards, ensuring a seamless match with your existing floor. While hiring professionals may incur additional costs, it can save you time, effort, and potential mistakes in the long run. Moreover, professional services often come with warranties, providing peace of mind that the repairs will be long-lasting.
11. Regular Maintenance
Maintaining your hardwood floors regularly can help prevent water damage and keep them looking their best. Clean your floors routinely using a dry mop or vacuum with a hardwood floor attachment to remove dust and debris. For deeper cleaning, use a damp (not wet) mop with a hardwood floor cleaner, ensuring you don’t leave standing water on the floor.
Inspect your floors periodically for signs of wear, scratches, or minor damage. Address these issues promptly to prevent them from escalating. Reapply a protective finish every few years, or as recommended by the manufacturer, to maintain the floor’s resistance to moisture and wear. Regular maintenance not only enhances the appearance of your floors but also extends their lifespan.
12. Monitor Humidity Levels
Wood is a natural material that expands and contracts with changes in humidity. Therefore, it’s essential to monitor and control the humidity levels in your home to protect your hardwood floors. Aim to keep indoor humidity between 30% and 50%.
Use a hygrometer to measure humidity levels and a humidifier or dehumidifier to maintain the optimal range. During hot and humid months, air conditioning can help reduce indoor humidity. In colder months, heating systems can dry out the air, so a humidifier may be necessary to prevent the wood from drying and cracking. By maintaining stable humidity levels, you can minimize the risk of your hardwood floors warping, cupping, or developing gaps.
Conclusion:
In conclusion, handling water-damaged hardwood floors requires timely and methodical steps to mitigate long-term damage and restore the flooring to its original condition. By assessing the damage, promptly removing standing water, thoroughly drying the area, and inspecting for any signs of structural issues, you can effectively address the immediate impact. Replacing damaged boards, addressing subfloor issues, and sanitizing the area help ensure the floor’s integrity and prevent mold growth.